When should you use custom domains?
Custom domains on neontools allow you to use your own domain instead of neon.ly and neon.page. In other words, you can replace “neon.ly” and/or “neon.page” with any domain you already own.
Your own domain will:
- ✨ improve your brand’s visibility each time you share any link
- 🧠 help your followers remember your brand
- ♾️ allow you to use any slugs you want
- 😇 make your online presence look more professional and trustworthy
Just in case you’re wondering what exactly a domain name is, this article will teach you the basics and more.
Don’t own your own domain yet?
No problem! Simply go to godaddy.com, check if the domain name you’re looking for is available, and purchase it. The process is straightforward and shouldn’t take you more than 10 minutes. For help check their guide “How to buy a domain name in 3 steps“.
How to add custom domains
Adding a payment plan
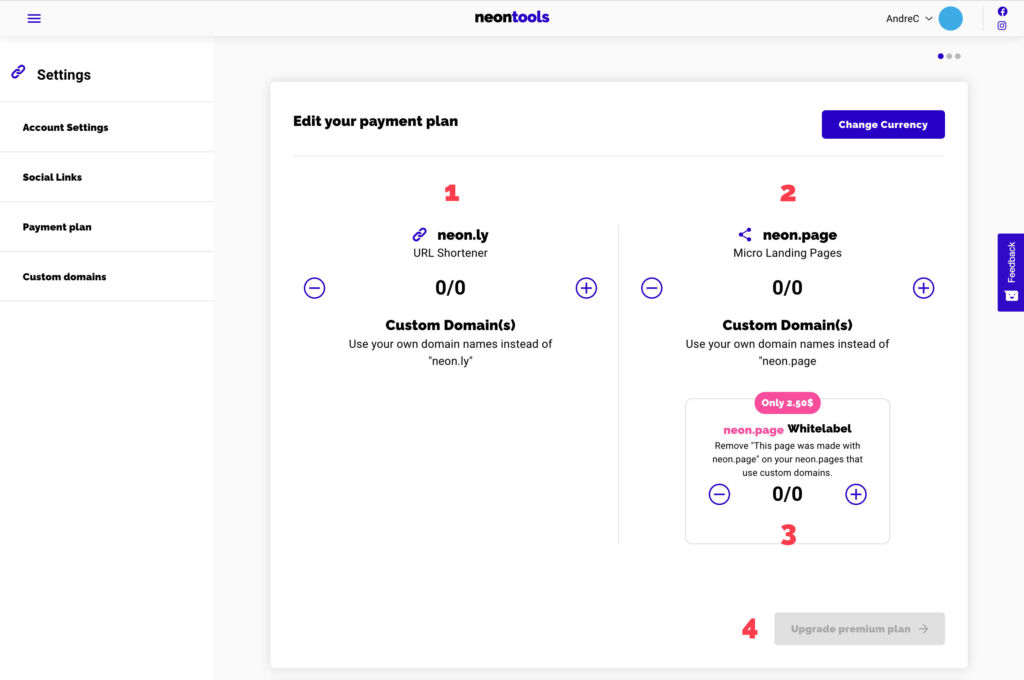
As custom domains are a paid feature, the very first step is adding a payment plan. You can do this by clicking on your username in the top right and choose “Payment Plan”.
1. There you can purchase credits for custom domains for neon.ly (1).
2. Or neon.page (2). Simply use the + and – buttons to add credits.
3. You can also remove the neon disclaimers on your custom neon.page (3).
4. When ready, click on the “Upgrade premium plan”. Continue the billing process until you reach the Success page.
Adding custom domains
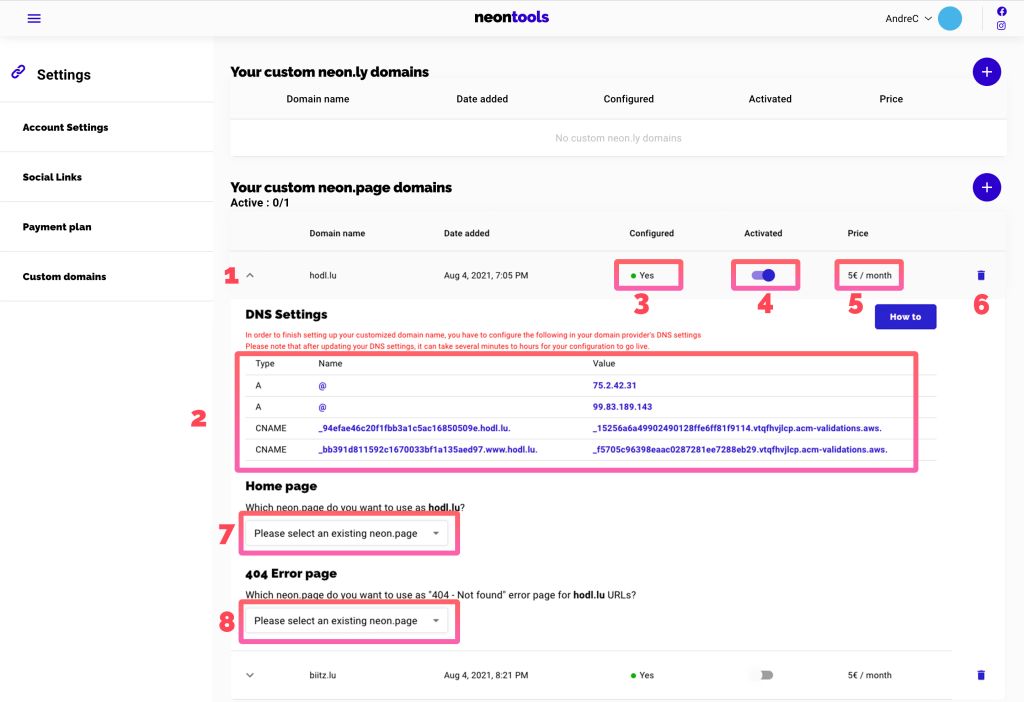
1. Open your custom domain settings. If your payment was successful, you should see this “Active: 0/1” sign (1). It shows how many of your purchased credits you’ve used.
2. If yes, click on the “+” button (2) on the right, add your domain to the input and click “Save”.

1. After saving the domain name, click on the arrow (1) to open the dropdown.
2. Now you need to head over to your DNS provider and create the 4 displayed records (2).
⚠️ Please note: in order for the custom domains to work, you will also need to replace/remove all your existing A records and CNAMES.
Here are tutorials from the most popular DNS providers to guide you:
- GoDaddy.com
- Namecheap.com
3. If you’ve correctly created the records, this indicator (3) will turn “green”.
4. When everything is ready, you can activate (4) the custom domain. This will set the “Active: 0/1” sign to 1/1.
5. This simply indicates the price you’re paying for this domain.
6. Delete custom domains with this button.
7. Setting a Home page means that you define to which neon.page your custom domain will point to when no slug is added. In our example, we can choose which neon.page is shown when someone goes to “hodl.lu”.
8. The Error page is the page that is shown when someone uses a slug with your custom domain that you did not define.
That’s it. You can now go to neon.ly or neon.page and choose your custom domain when creating new links or pages.
All tutorials
FAQs |
for specific answers |
before you start |
set up your account |
how to upgrade to neontoolsPro |
boost your tools |
Post Automator |
automate your Social Media |
neon.ly |
URL shortener |
neon.page |
microlanding pages / link in bio |
neon.page link clicks |
tracking individual link clicks |
neon.page + Google Analytics |
track your page with GA4 |
neon.page + Meta Pixel |
track your page with Meta |
neon.page + Matomo |
track your page with Meta |
Collect emails |
collect emails directly from your neon.page |
Custom Domains |
add custom domains to neon.ly or neon.page |
Social Audit |
influencer analyzer and collections |
Hashtag Analyzer |
for Instagram™ hashtags |
Interest Browser |
for Facebook™ Ads |
Reach Calculator |
for social media campaigns |
UTM Generator |
to track your links |
QR Code Generator |
create offline links |
Browser Extension |
for neon.ly & Social Audit |
Why we built neontools
We built neontools.io because we were overwhelmed by the number of marketing tools we were using to help our clients. The neontools.io platform therefore provides all these classic and essential marketing tools in one place.
