When should you use Post Automator?
Simple answer: You want to post to Social Media but don’t want to spend too much time writing captions, coming up with hashtags and scheduling posts.
The tool helps you to:
- ✍️ write captions based on the image you have uploaded and the settings you have configured
- #️⃣ come up with hashtags fitting your account
- 🤖 schedule post automatically
All you need to do is upload pictures! Post Automator takes care of the rest.
How to use Post Automator
Connecting your Social Media accounts
If you have already connected your Instagram Creator or Business account, you can skip this part.
Otherwise,
- click on “Connect your Instagram”,
- then go through the Connection Process.
If you need more help connecting your Socials, check out this guide.
⚡ Please note that only Business or Creator accounts can be analyzed. In case you want to turn your own account into a business account, you can follow the instructions in this neon academy lesson.
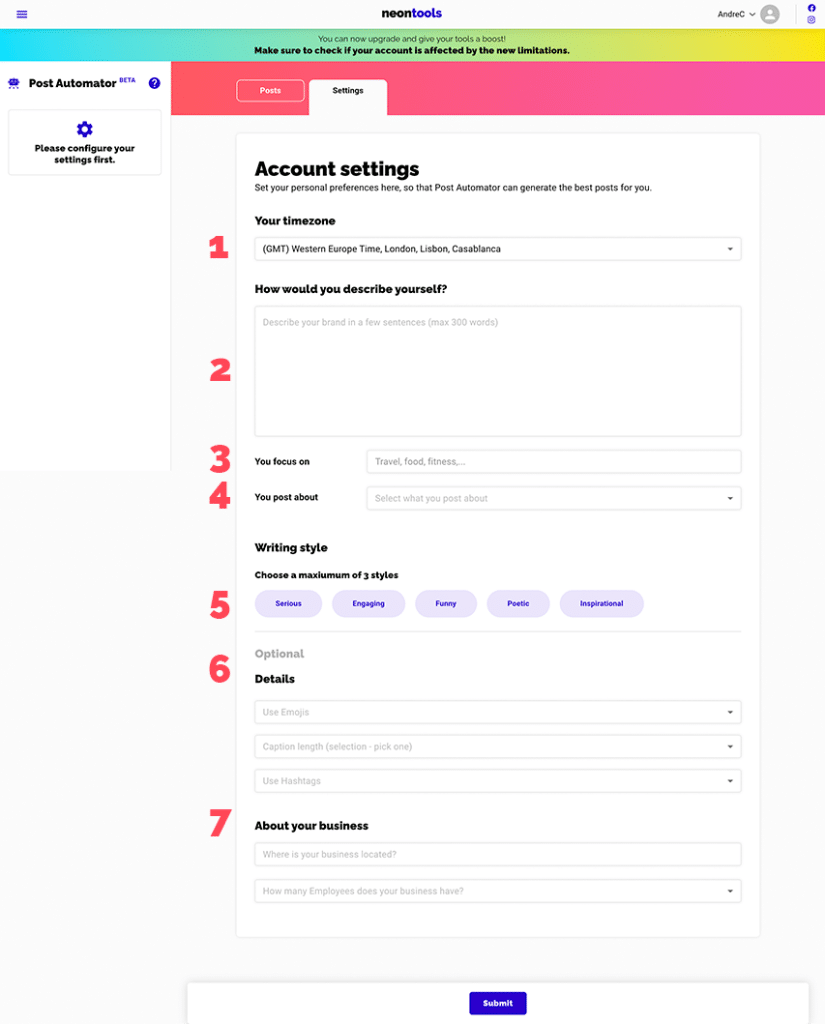
Configure your Settings
First, you need to provide some information about the Instagram account you will use to post. This will influence the captions and hashtags the Post Automator will come up with. These Settings only need to be set once, but can always be edited.
Open the Post Automator Settings with the tab in the top.
- Your timezone helps the Post Automator to understand when your best time to post is
- Give a brief description about yourself, your brand, or your business. Simply explain what your Instagram account is all about.
- Give some brief keywords on the main topics your account focusses on.
- Select what you post about.
- The writing style will determine how the captions sounds and feels like.
- Details like Emojis, caption length and hashtags are optional, but will help make captions more to your liking.
- If you are running a business behind the Instagram account, you can provide more information here.
That’s it. Submit the settings and start uploading pictures!
⚡ Please note that we do not guarantee that all generated captions will be 100% accurate.
Posting to Instagram
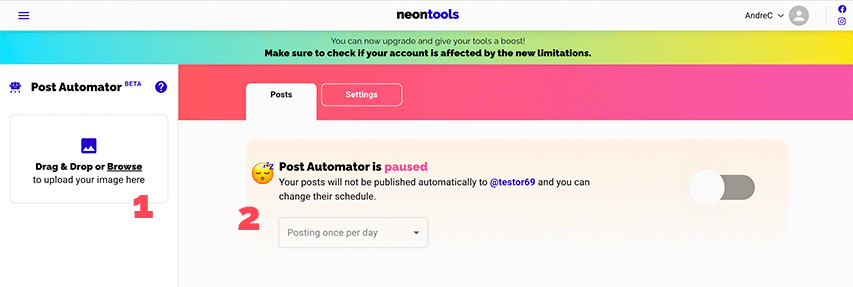
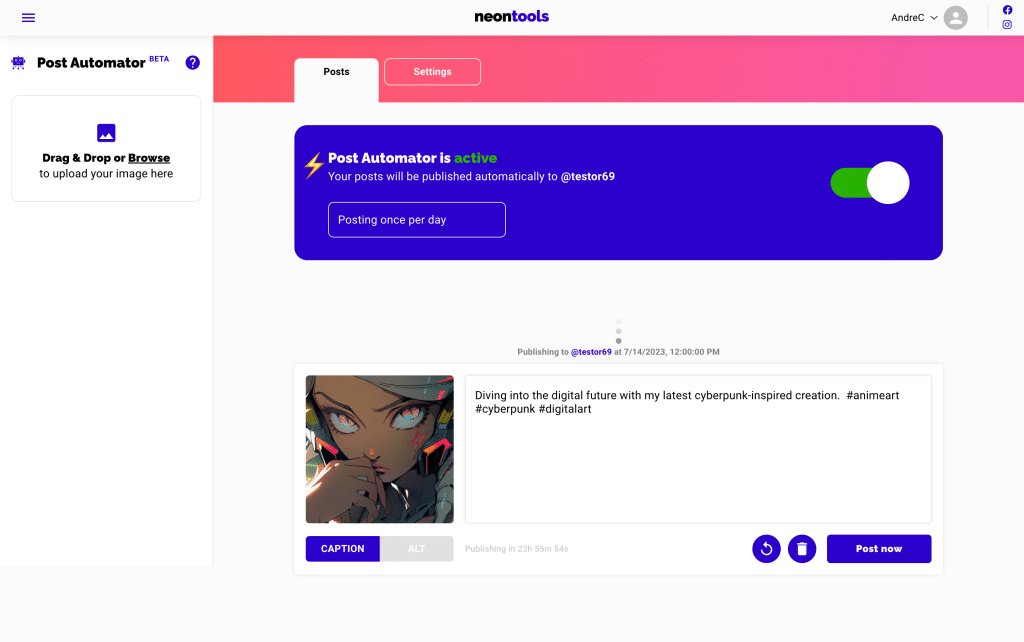
- Now that you have configured your Settings, you can go ahead an Upload images (1) in the sidebar. You can also upload multiple images in one go.
- Please note that the post automator is “paused” by default. This means it will not post automatically to Instagram. You can activate it by flipping the switch on the right.
Once you have uploaded an image, it will appear with a loading bar while a caption is being generated. This can take up to 15 seconds.
In some cases it might take longer than expected. If nothing happens at all after 1 minute, try reloading the page and uploading again.
⚡ Do not close the window while captions are being generated. Images for which captions are being generated might be lost and you’ll have to re-upload them.

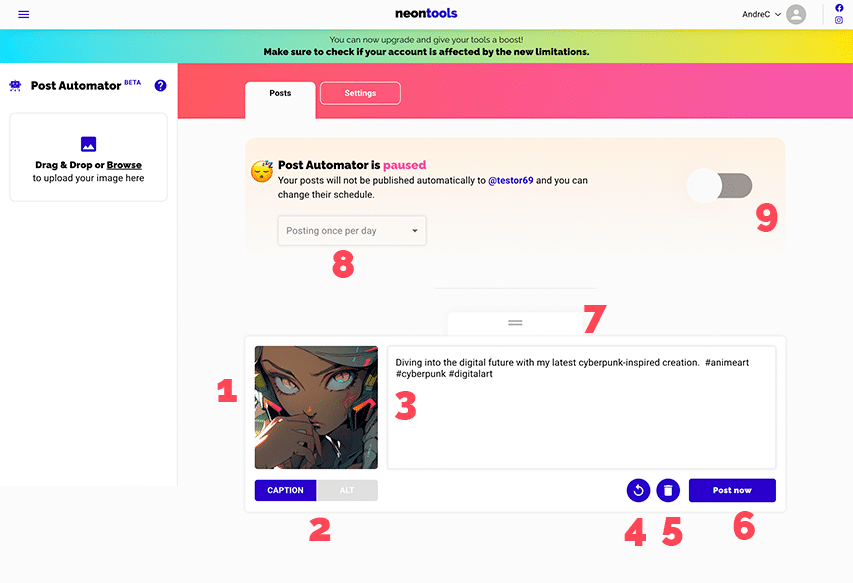
- When the Post Automator is done, your post will appear as card.
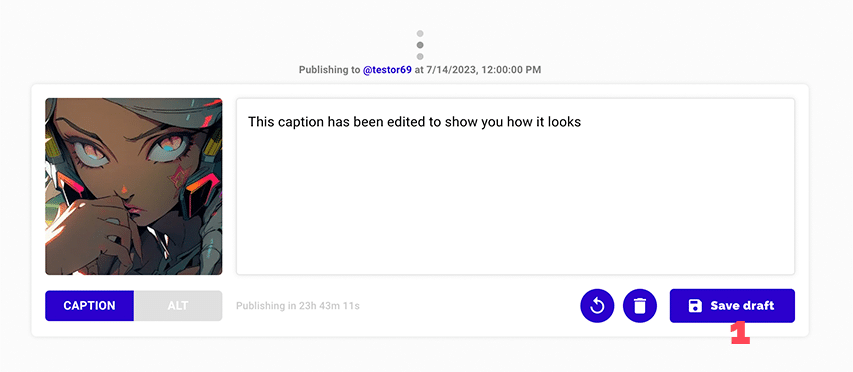
- You can switch between the generated Caption and the Alt text which is the description of what Post Automator sees in your image.
- You can see your Caption and Alt text in the big field. You can also edit them directly in the text field. The “Post now” will turn into a “Save Draft” button. Hit it to save your changes.
- You can always generate a new caption. If you change the Alt text and save it, new captions will be based on the new Alt text.
- Post can be deleted here.
- Instead of scheduling posts for later, you can also Post immediately with the “Post now” button.
- The order in which scheduled posts are posted can be edited by drag and dropping the cards. The top one is the post that will be published next.
- You can set the posting frequency with this dropdown (8). Scheduling more than 3 posts per month is a neontoolsPro feature.
- Once you are ready to schedule and publish your posts, flip the switch to activate Post Automator! Once Post Automator is active, you cannot change the order of your posts, or edit captions. To do so, you need to pause it again. Switching between Active and Paused Mode can be done any number of times.
When you flip the switch, Post Automator goes into Active Mode. This means your Posts will be published based on the frequency that you’ve set. You can see the posting information above the card.
You can still change your Captions and Alts in this mode, but remember to click “Save draft” after you’ve finished editing them.
To change the order of published posts when, you need to switch back to the Pause Mode.
That’s it! You are now ready to post!
All tutorials
FAQs |
for specific answers |
before you start |
set up your account |
how to upgrade to neontoolsPro |
boost your tools |
Post Automator |
automate your Social Media |
neon.ly |
URL shortener |
neon.page |
microlanding pages / link in bio |
neon.page link clicks |
tracking individual link clicks |
neon.page + Google Analytics |
track your page with GA4 |
neon.page + Meta Pixel |
track your page with Meta |
neon.page + Matomo |
track your page with Meta |
Collect emails |
collect emails directly from your neon.page |
Custom Domains |
add custom domains to neon.ly or neon.page |
Social Audit |
influencer analyzer and collections |
Hashtag Analyzer |
for Instagram™ hashtags |
Interest Browser |
for Facebook™ Ads |
Reach Calculator |
for social media campaigns |
UTM Generator |
to track your links |
QR Code Generator |
create offline links |
Browser Extension |
for neon.ly & Social Audit |
Why we built neontools
We built neontools.io because we were overwhelmed by the number of marketing tools we were using to help our clients. The neontools.io platform therefore provides all these classic and essential marketing tools in one place.